Back in business
You'll be pleased to know the Marmadaisy shop is back online!
Hurrah!
You'll be pleased to know the Marmadaisy shop is back online!
Hurrah!
Posted by
Marmadaisy
at
4/11/2009 02:03:00 pm
7
comments
![]()
Labels: Bags, General stuff, sewing
Take a look at this, which has really made me giggle today.
Posted by
Marmadaisy
at
9/13/2008 04:12:00 pm
4
comments
![]()
Labels: General stuff, sewing

For 4 pieces of each fabric you will only need to do one side. If your fabric has a right/left top/bottom make sure you do two of each.
Lay your horizontal strips on a desk, with the unfinished edges top and bottom.


Continue on the next row, alternating each row. Use a pin at each end, until you get to the top. Pin along the top. (I did take a picture, but it didn't come out for some reason) You will end up with a checkerboard effect.
 Make sure that you butt each piece close to its neighbour, otherwise your interfacing will show and it will look rubbish. You can see here how my ironing board was showing through a crack. Fiddle with the pieces until they all match up.
To make it up:
Iron the interfacing to the fabric pieces. Take your time and use a pressing motion. Make sure it is all stuck down well.
Put the pieces right sides together and make sure they fit together, trim if necessary.
Sew the two fabric/interfaced pieces together along the sides and bottom.
 This is a winged needle. I used this to get through all the layers (because that interfacing is thick). You will need to use a needle for heavy duty sewing. I noticed my machine was missing stitches and the thread kept snapping. I changed to some better quality Gutterman thread for the top stitching and I had no more problems - so try to use the best quality thread you have.
Cut a 3.5" square from the bottom 2 corners. Open up the trimmed corners and squash down so that the side seams match up.
 Carefully sew along the corner seams. I did two lots of stitching for a good seam.
To attach, fold the ends of the handle (without interfacing) over the top of the basket, and then back onto the front of the basket, then stitch. (The handle will be stitched front and back of the basket)
Fold the handle UNDER the basket, and repeat on the other side.
The bit I forgot:
Measure your bottom piece and cut a bag bottom to size. Cut this in half legthways and glue each piece in the bottom, either side of the centre seam.
Sew the lining:
As for the outer shell, but only sew a few inches on the bottom edge. Leave a big gape in the middle (most of the length of the bottom, because you need a lot of room to push the basket through).
Put the basket into the lining, right sides together.
It will be very fiddly - sew the top edges together. Because the handle is tight, do one side at a time. Put your hand through the lining gap to move the handle to the opposite side to the one you are stitching, so that any distortion is on that side, and your stitching side is smooth.
Pull the bag through the hole and stitch the bottom closed.
Because your lining is slightly bigger than your basket, it will show proud over the top. This is on purpose, so you don't have to deal with trying to press the blazes out of that heavily lined top seam.
Press all the sides and corners to get a neat finish.

I'm certainly going to make some of these in Christmas fabrics to fill with pine cones. I would also love to have a go at a ribbon version.
Posted by
Marmadaisy
at
9/04/2008 04:24:00 pm
14
comments
![]()
Labels: Fat Quarter Friday, sewing, Tutorials
Yesterday I had a little clear up in the sewing room. It actually wasn't too bad, except for one corner which holds all my odd bits that don't belong anywhere else.
The worst mess was my two baskets of "odds" - these are hampers that contain small scraps of fabric, bits of interfacing that might be useful and bits of leftover patchwork.
I wish I had taken a "before" picture, but I didn't think.
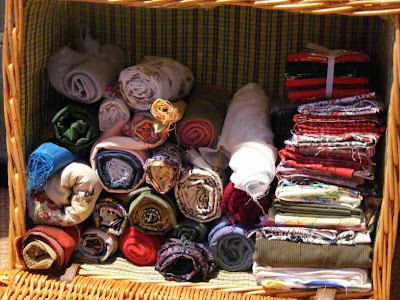
Anyway, I folded my interfacing neatly, threw away all the tiny scraps (how many teeny bits am I going to need, anyway?). I wanted to work out a way of storing the scrap fabrics neatly. Now, I'm not the best folder so I came up with this:

The best bit though, is the small scrap arrangement. I usually keep these odds that are too small to be useful because it's always handy for checking tension, practising a stitch or seeing how a technique will work before messing up your "real" and expensive fabric. So I thought it doesn't really matter what colour these bits are - it's important to sort them by type. So, I now have rolls of t-shirt fabric, fleece, light cotton, muslin, heavy cotton etc. Now, when I want to check my tension, I just need to select the appropriate roll and take what I need, rather than rummaging in a massive box of bits. Good, eh?
Posted by
Marmadaisy
at
9/04/2008 03:35:00 pm
0
comments
![]()
Labels: I'm up to stuff, sewing

OK, so it won't win any prizes, but at less than 2 days (including time taken to make dinners, do laundry, walk dogs, blah-di-blah) it's by far the quickest cover I've ever made.

I then used a 10cm border in matching fabric. I backed it with an old duvet cover, attaching between border and patchwork. I roll hemmed the border, and underneath (on the backing piece) overlocked longer strips of co-ordinating fabric. Easy peasy.
Unfortunately, the colours aren't exactly right for this time of year (because I've been putting this off for ages) so I'll have to make another for Autumn.
* My rotary cutter and I have been eyeing each other nervously for about 18 months. I used it once and decided I didn't like it. I have now made friends with it after realising that, as with most things, it's all down to having the right equipment to use with it and getting the right technique. It would have taken me forever to do this quilt without it.
Posted by
Marmadaisy
at
9/01/2008 06:44:00 pm
17
comments
![]()
Labels: I'm up to stuff, sewing
Oh there's so much to do. Mr Marmadaisy and I are away for the weekend, going to the wedding that never was (don't ask!) and I still haven't written my final assignment for university, or even started revising.


Posted by
Marmadaisy
at
8/19/2008 10:17:00 pm
14
comments
![]()
Labels: sewing
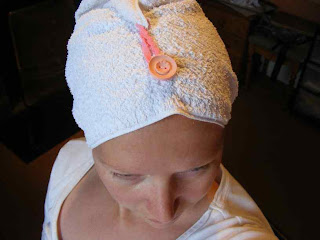
Another one that's not too exciting ... but a useful thing anyway! As someone with long hair I can confirm that it's mightily annoying to have your towel spontaneously unwrap and drop dripping hair everywhere.
We all have those towels that have seen better days, lost their "fluffiness" and are, frankly, only good for wiping dogs' feet.
This is quite a good way to use an old towel. Or you could use a nice new one, if you wanted to give it as a gift.

Measure - on the folded side - 23cm up and mark with chalk. Then measure 8cm in from that mark. Then measure 8cm down from the same mark (ie 15cm up from edge).

Then free-hand draw a curve from your inner mark to the outer edge of your towel (it should be about 60cms long).
 You can see on the left-hand side of this picture that I have made marks at 23cms from the finished edge, then 8cms down from that and 8cms in, and connected them in a curve.
 Cut out the shape, and in the corner pin about 10cms of folded elastic .


Posted by
Marmadaisy
at
8/12/2008 06:14:00 pm
13
comments
![]()
Labels: I'm up to stuff, sewing, Tutorials
Here is another Fat Quarter Friday (ignore the fact that it's Monday) tutorial.
I was inspired by some japanesey fabric I had to make this thick belt. It's great for covering a multitude of sins, can be made in no time at all and makes you look like you have an hourglass figure, even if you don't.

This pattern piece goes on the fold (on the side edge). Cut one in your fabric, and one of contrasting fabric.


Pin in place around three sides, and poke the straps throught the bottom. This will keep them out of the way of the stitching and remind you not to stitch all the way around. TIP: Before stitching, hold the belt up with your pattern the right way around and facing out (as you would wear it) and double check the straps are in the right place.


Then fold over the fourth edge, pin, press.

(ew, I think my machine is due a clean!)
Posted by
Marmadaisy
at
8/11/2008 02:47:00 pm
5
comments
![]()
Labels: Fat Quarter Friday, sewing
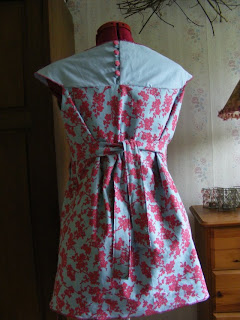
I think overlocking is addictive. Or it could be this Anna Tunic from Amy Butler.
I made this one almost entirely on the overlocker and I'll say it again: it's quick!!
I changed the belt a bit. I was inspired by the fabric to create a thicker belt which is much more flattering for my shape. It is designed to sit under the best and cinch in the waist and I love how it alters the shape of the top. I'll model this properly later.

I overlocked around the neck-line and on the sleeves.


Guess how much housework is NOT getting done in our house this week?
Posted by
Marmadaisy
at
8/10/2008 01:39:00 pm
3
comments
![]()
Labels: I'm up to stuff, sewing
Rate Me on BlogHop.com!
![]()
![]()
![]()
![]()
![]() help?
help?


 I'm listed in the big list of sewing blogs