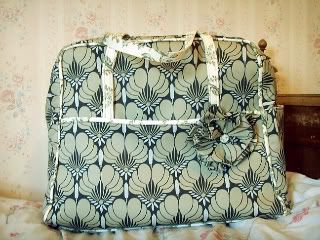
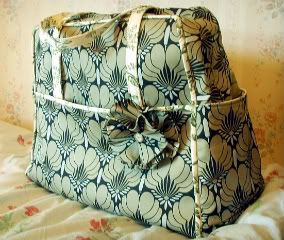
The Amy Butler weekender bag
Here are the "proper" pictures of my bag (which still aren't very good - this weather is just terrible for photos).
It was pretty straightforward to follow, but the bulky layers did make it tricky to cope with. Definitely not a bag for the first-timer. The cutting was a pain (my least favourite bit of any pattern) I do sometimes wonder if LaButler has someone to do all her cutting out for her, because she always seems to have LOADS in her patterns. I made a couple of adjustments to the instructions because I like to be rebellious.
Firstly, I substituted the timtex. I find it to be very difficult to work with and, personally, I like my bags to have a bit of flexibility in them. If I'm making a basket style bag I'll interface the be-jesus out of it, but I wanted a slightly less rigid style for this one. I used some leatherette fabric that I bought last year thinking it was a bargain, that turned out to be quite cheapy looking. Although it's a good, thick vinyl type fabric, it didn't stitch nicely. I used that instead of the timtex and I'm pleased with the result. The only thing is that it was a bit slippery even when pinned, so it took a bit of patience.
When sewing the zip in place, I used the glue stick method. Use any ordinary craft glue stick, and put a line along each side of the zip. Then, iron it onto the fabric. Instead of pinning, this keeps the zip in exactly the right place without the bulk.
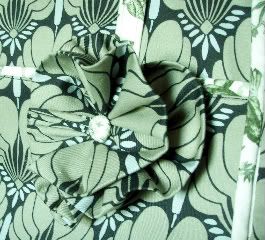
I also added a fabric flower to make it a bit different. I used a strip of fabric 4" by about 40" and ironed it in half, wrong sides together. Then I used long stitches (double thread) along the length of the raw edge, then pulled it into a gather. I then wrapped the gathered piece up into a flower shape and secured with a few stitches. I covered a button in lining fabric and sewed in the centre to make it all nice and neat. Then I just glued it in place.
When I make the next one (I already have an order) I'll put some bag feet on the bottom. I was going to do it with this one but I was so tired finishing it off I was scared of getting them in the wrong place and completely ruining the whole bag. The other thing I might do is make some zip pockets in the lining, for extra storage (and also so people go "wow, aren't you clever!"). See, I'm already talking about the next one!


7 comments:
I've just found you via Crafty Blogs and love the things you are making!
Your bag is soooo gorgeous!!
I'm looking forward to reading more :)
x
I'm loving the bag. I've been tempted to have a go at this pattern myself but it always looked a bit complex for my begginner sewing skills. Yours looks fantastic - I especially love the little details.
WELL DONE. I have ahd this pattern for nearly a year and keep talking myself out of making it. You have inspired me.
Thanks for the nice comment on flickr! I felt that I breezed through the first Weekender (the one featured on flickr).
Then I set about making a RockNRoll Weekender that I love and it nearly smoked my machine.
Plus - good thinking on the feet. I ordered in feet for the second bag and despite multiple measuring and thinking and rethinking it, I managed to get them too far to the ends of the bag and it sits rather awkwardly.
LOVE your rings - I've been whipping up a few of those around here as well!
This is gorgeous! And happy belated birthday too (although if I'm commenting on a post that was posted before your actual birthday that looks like I was actually sending early wishes...very cunning!) x
Thanks for all your useful tips on here. I think your bags are superlicious ! I was thinking of going back to bag making again(after making 53 last year for a local charity and being all "bagged" out! ) and seeing your blog has given me the incentive to get my sewing machine out again...thanks hon.
this is a great bag- i subbed the timtex too, it's WAY too stiff! I used heavy-duty interfacing, and a friend used canvas. I love my bag, I use it daily for work- it's roomy & styling. Another improvement is to add velcro squares to keep the outside pockets flat against the sides, you'll see after a bit of wear it gets softer/flimsier and the pockets start to flap open,exposing all your stuff hiding inside!
Post a Comment