Fat Quarter Friday Tutorial - Folding tray
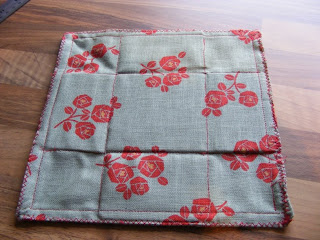
Welcome to this week's Fat Quarter Friday Tutorial. This week, we will be making this little dish for putting your rings, watch etc in. This tray folds down flat for travelling, it takes up no room in a suitcase or bag, but then when you want it you just clip it togather and you have a little dish for bits and bobs. Great for when you are on holiday. This would also be a great gift for a man (they are so hard to make things for) as a change tray.
You will need:
2 pieces of fabric 22cm by 23cm (I've made it slightly longer on one side for ease in the final steps)
1 piece of card 8cm square
4 pieces of card 8cmx5cm
4 press-studs
Ribbon to decorate (optional)
To put it together:
First, sew the two squares together, right sides together leaving one of the shorter edges open.
 Turn right side out and press, making sure to push out the corners fully.
 With the open end at the bottom, measure and mark with chalk 6 cm in from the edge, then 8cm from this mark. Draw a straight line down so that the fabric is divided into 3 sections. Sew down these lines, leaving 1cm at the top and 2cms at the bottom.
Draw lines in the same way horizontally, at 6cm and 14 cm from the top edge, but do not stitch yet.

This will be the placement of the cardboard pieces in the following steps.
![]() Insert piece 1. Sew the first horizontal line to keep it in place.
Insert piece 1. Sew the first horizontal line to keep it in place.
Insert centre piece, and pieces 2 and 3. Sew the next line.
Insert piece 4.
It should now look like this:
 Fold in the bottom edge, press and sew a 1cm margin all around each edge.
Use a decorative stitch (I just used zig-zag for speed) all around.
 Sew press studs at the sewn lines on each non- card corner as shown.
 Put some ribbon or ric rac around the outside, if you want.
To assemble, simple press the press- studs together at the corner to make a box shape.

Don't forget, there's a prize for one person who comments on this post. I'll draw names out of a hat (or something) in one week.


39 comments:
That is a seriously cool idea! I love it! I don't know how you think these things up! Storing this one up for future MIL present opportunities.
xMx
This is amazing!
Maybe a Fathers day present
April xx
Auntie's Birthday soon so thinking one of these and a matching jewellery roll. Thanks for the idea!
What a fab idea there are more than nits in your head young lady!!!!xxxx
Another great project! Thank you so much for all the marvelous ideas you share; you are certainly keeping me busy and semi-out of mischief.
These are lovely and easy to post flat! I must make a few asap.
These are so neat!
How cool is that? And it looks so easy. I might just have to make one this weekend! Thanks!
Great idea! I'll definitely be making these as gifties!
What an awesome tutorial. I will definitely make this for hubby as I've been trying to figure out what to do for Father's Day. As he dumps his pockets onto his nightstand this will be perfect for him.
Hugs!!!
Great idea for using up some stash fabric.
Those would make wonderful graduation gifts!!
And I am in love with that fabric!
You write great easy to follow tutorials.
I totally saw one of these for sale in a shop today! They'd used Chinese ties instead of press studs, you know the ones on traditional Chinese Dress fronts? That tuck into a loop? Eek bad description!
But love the tutorial!!! xoxo
Do you use a special machine foot to sew so close to the card?
Lovely gift idea.
Thanks for the comments, no special foot, although you could use your zipper foot if your card is thick.
Fab idea. Thanks for the tutorial. Deb x
how do you think up these ideas you are a marvel. Adding it to my to do list and ideas for birthday presents list.
Oh, seriously gorgeous. Now I have an excuse to purchase some fabric I've had my eye on!
that's ingenious!!
I love your "Fat Quarter Friday Tutorials". I was just thinking that I needed somewhere to keep my earrings and look what ya made...Thanks!
I just found your blog through sew mama sew. Great tutorials! I'm adding you to my favorites! Thanks so much.
This is really cute & practical. Thanks for showing us how to make it.
Lisa
What a sweet little folding tray. I think you're right about this making a good pressie for a man. They're so tricksy to make things for!
Excellent tutorial!
what a great idea! and all the FQ tutorials are brilliant, perfect for using up leftover fabric!
Make all the FQ ideas up through the year and xmas pressie problem is sorted and saving money as well!
Josie x
Thanks for the fool proof tutorial!
The basket reminds me of my visit to Provence ( France) where they use these baskets for serving bread. They have georgious print fabrics for them.
What a ROCK-O-LICIOUS idea & tute!!!..Love, love love this fat quarter concept!..Thanks for sharing! Creative blessings, Debbie
you know i just saw these for sale in a store for 15.00 per.. ugh that is too much i said and here I turn to your blog and wham there they are all neat and tidy for me to make . thanks again!!
Brilliant tutorial, thanks for sharing I love fabric bowls :)
Just stumpled upon your blog - love the little folding box and I'll certainly take time to look through your other tutorials - they look fab
I dropped by again to let you know I did indeed try your folding fabric tray tutorial and have posted the results on my blog today (as well as a link to your tutorial). Thank you so much for a fun project!
Got to your blog via Junie Moon.
What a great tutorial.
I'll have to have a go on the weekend. Thanks for sharing.
Ohhh, so cute! I think I'll make one of these in Halloween fabric to take candy corn to work ~ thank you so much!
Very good idea!!!! I do it!!!
Sorry, but i don,t speak english...
Awesome idea for using up scraps, I love it!
Guess what everyone's getting for Xmas this year...hee hee hee.
I think this is awesome. I wish my brain would work like that again. I guess its getting too old.LOL
t4family5
I wish my mind could think of things like this again.I guess it's just too old this is just awsome.
Thanks for showing us.
t4family5
What a great idea!!
Thanks for sharing it with us.
I have already shared the link with my friends :-) I can see baskets popping up everywhere !
Liz
What a simple yet pretty idea!! Inspiring even for a non-sewing person like me! I won't be surprised if I make this over one of the coming weekends!! :-)
Post a Comment