
How To Re-cover A Lamp Tutorial

This is another of my super-easy tutorials. It took me less than an hour and a half, including making the tea and taking pictures.
This is my own work, please do not copy it. You can redistribute or post on your own blog linking back to me. Thanks!
We had had this old lamp for ages, and last year I hit upon the bright idea of covering it in glue and sticking fabric to it. It didn't work and made a mess but Mr Marmadaisy (being far too nice to say so) put it in the spare room anyway.
Having improved my skills somewhat I have had another go and it looks fabby now.
You will need:
Enough fabric to cover your shade (It depends on the size, obviously. Mine took 1/2 yard)
Some newspaper and masking tape
Scissors, blade and pegs
Some decorative yarn, thread or ribbon, plus a large enough darning needle
Some double folded bias binding
Thread
One large cup of tea with two sugars (optional)
How to make the pattern:
These shades are tricky to cover because they are a funny shape. Now, this will be a lot easier if yours is a drum shape, but my way (as always) makes things nice and simple for adapting to whatever shape your shade is.
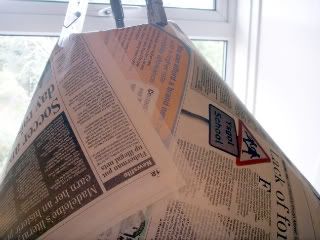
First, keeping the shade ON the lamp, start by pegging a couple of pieces of newspaper onto the top of the shade. Peg the pieces diagonally as this makes it easier to get the shape right. To start with, just peg the sheets at the top and tuck them in. You need to get them nice and flat.
Then, start to stick the loose sheets together at the edges using masking tape. We use masking tape because it can be repositioned easily. Take your time over this and make sure your paper is smooth, wrinkle free, and fitting like a glove.
When you are happy with the overall fit around the shade, trim off the excess paper at top and bottom. I found it easier to chop off the excess and then trim with a blade close to the edge of the shade. Check again that your paper pattern fits perfectly.
Now, using a ruler, mark a straight line down one side. Remove the paper template and cut along the line you have just drawn. Re-stick any paper bits as necessary and check again that the template fits perfectly (use your pegs again to keep it in place).

At this point, let me talk about fabric. Light bulbs get hot. Man-made fabrics often melt at fairy low temperatures. Use 100% cotton for this project, and do not exceed a 40w bulb. Check your fabric's care instructions before use. Please do not burn your house down.
How to put the shade together
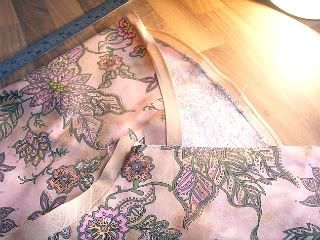
Pre-wash and iron your fabric. It needs to be wrinkle free as there is no margin for error in this project. If you skip this step it'll all end in tears (believe me). Lay out your paper template on the bias. Cutting fabric on the bias makes it much more forgiving for this project. If you are making a shade with straight sides (like a drum) you will probably get away with laying it on the weft.
Pin in place and add a 1cm margin (this will be your seam allowance) to each of the straight sides, then cut out.
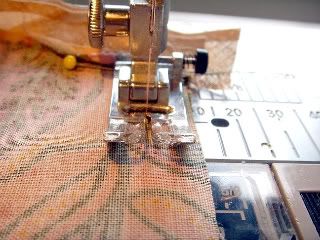
Start by pinning your bias binding onto the long curved edge of the frame. Do this by unfolding one side of the binding and pinning it (right sides together) along the edge. Sew along what was the fold line. Do the same for the inner curve. Press. Be persuasive with that bias binding and make it sit straight.
Now, with right sides together, match up your two side edges. They need to fit perfectly, so make sure you line up your binding seams evenly at top and bottom.
Sew a 1cm seam down the side. You don't need to finish off the edge. Trim the seam allowance and press.
Take the old shade off the lamp (because it's easier to fiddle with). Turn the new shade right side out, and pull over the old shade. Pull it tight, pin if necessary and make it fit. This is why we cut on the bias! Tuck the bias binding over the top, and under the bottom.
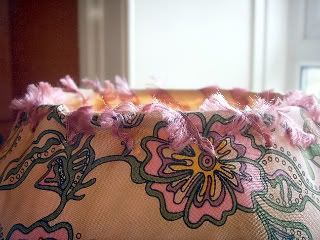
Thread some fine ribbon, decorative thread or yarn (I used eyelash yarn) onto a darning needle.
If necessary, mark out evenly spaced dots with chalk or pencil. Then, starting from the inside sew large stitches over the edge. This tucks the bias inside the shade and makes a decorative edge.
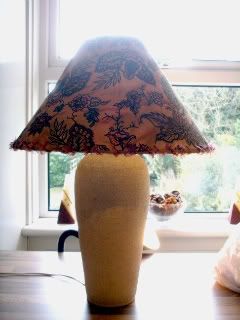
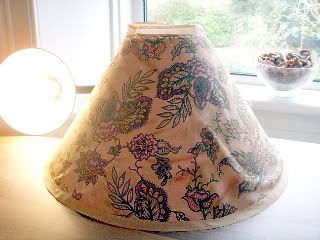
Fit the shade back onto the lamp and put in pride of place.
Hurray! No more fugly lamp-shades!
This is my own work, please do not copy it. You can redistribute or post on your own blog linking back to me. Thanks!
We had had this old lamp for ages, and last year I hit upon the bright idea of covering it in glue and sticking fabric to it. It didn't work and made a mess but Mr Marmadaisy (being far too nice to say so) put it in the spare room anyway.
Having improved my skills somewhat I have had another go and it looks fabby now.
You will need:
Enough fabric to cover your shade (It depends on the size, obviously. Mine took 1/2 yard)
Some newspaper and masking tape
Scissors, blade and pegs
Some decorative yarn, thread or ribbon, plus a large enough darning needle
Some double folded bias binding
Thread
One large cup of tea with two sugars (optional)
How to make the pattern:
These shades are tricky to cover because they are a funny shape. Now, this will be a lot easier if yours is a drum shape, but my way (as always) makes things nice and simple for adapting to whatever shape your shade is.
First, keeping the shade ON the lamp, start by pegging a couple of pieces of newspaper onto the top of the shade. Peg the pieces diagonally as this makes it easier to get the shape right. To start with, just peg the sheets at the top and tuck them in. You need to get them nice and flat.
Then, start to stick the loose sheets together at the edges using masking tape. We use masking tape because it can be repositioned easily. Take your time over this and make sure your paper is smooth, wrinkle free, and fitting like a glove.

When you are happy with the overall fit around the shade, trim off the excess paper at top and bottom. I found it easier to chop off the excess and then trim with a blade close to the edge of the shade. Check again that your paper pattern fits perfectly.
Now, using a ruler, mark a straight line down one side. Remove the paper template and cut along the line you have just drawn. Re-stick any paper bits as necessary and check again that the template fits perfectly (use your pegs again to keep it in place).

At this point, let me talk about fabric. Light bulbs get hot. Man-made fabrics often melt at fairy low temperatures. Use 100% cotton for this project, and do not exceed a 40w bulb. Check your fabric's care instructions before use. Please do not burn your house down.
How to put the shade together
Pre-wash and iron your fabric. It needs to be wrinkle free as there is no margin for error in this project. If you skip this step it'll all end in tears (believe me). Lay out your paper template on the bias. Cutting fabric on the bias makes it much more forgiving for this project. If you are making a shade with straight sides (like a drum) you will probably get away with laying it on the weft.
Pin in place and add a 1cm margin (this will be your seam allowance) to each of the straight sides, then cut out.
Start by pinning your bias binding onto the long curved edge of the frame. Do this by unfolding one side of the binding and pinning it (right sides together) along the edge. Sew along what was the fold line. Do the same for the inner curve. Press. Be persuasive with that bias binding and make it sit straight.

Now, with right sides together, match up your two side edges. They need to fit perfectly, so make sure you line up your binding seams evenly at top and bottom.
Sew a 1cm seam down the side. You don't need to finish off the edge. Trim the seam allowance and press.

Take the old shade off the lamp (because it's easier to fiddle with). Turn the new shade right side out, and pull over the old shade. Pull it tight, pin if necessary and make it fit. This is why we cut on the bias! Tuck the bias binding over the top, and under the bottom.

Thread some fine ribbon, decorative thread or yarn (I used eyelash yarn) onto a darning needle.
If necessary, mark out evenly spaced dots with chalk or pencil. Then, starting from the inside sew large stitches over the edge. This tucks the bias inside the shade and makes a decorative edge.


Fit the shade back onto the lamp and put in pride of place.
Hurray! No more fugly lamp-shades!
![]()


4 comments:
Thta looks really fab - I love the fabric!
April xx
That's wonderful!!
Cheers and Huggs!! Congratulations on being one of three winners at U-handbag!!! Said your bag was good! Well odne, which pattern are you going to choose? i have got the fabric for the Sophia bag and hopefully it is my Easter Hols project.
I have a few old lampshades in the loft you've given me an idea now. Well done for being one of the U-handbag comp winners.
Post a Comment